Showing posts with label Preparedness Project. Show all posts

Wednesday, April 13, 2011

Camp Kitchen Organizer!


Today's Project
is a
Camp Kitchen Organizer!
My friend Crystal Cheney shared it with me
and I have to tell you...
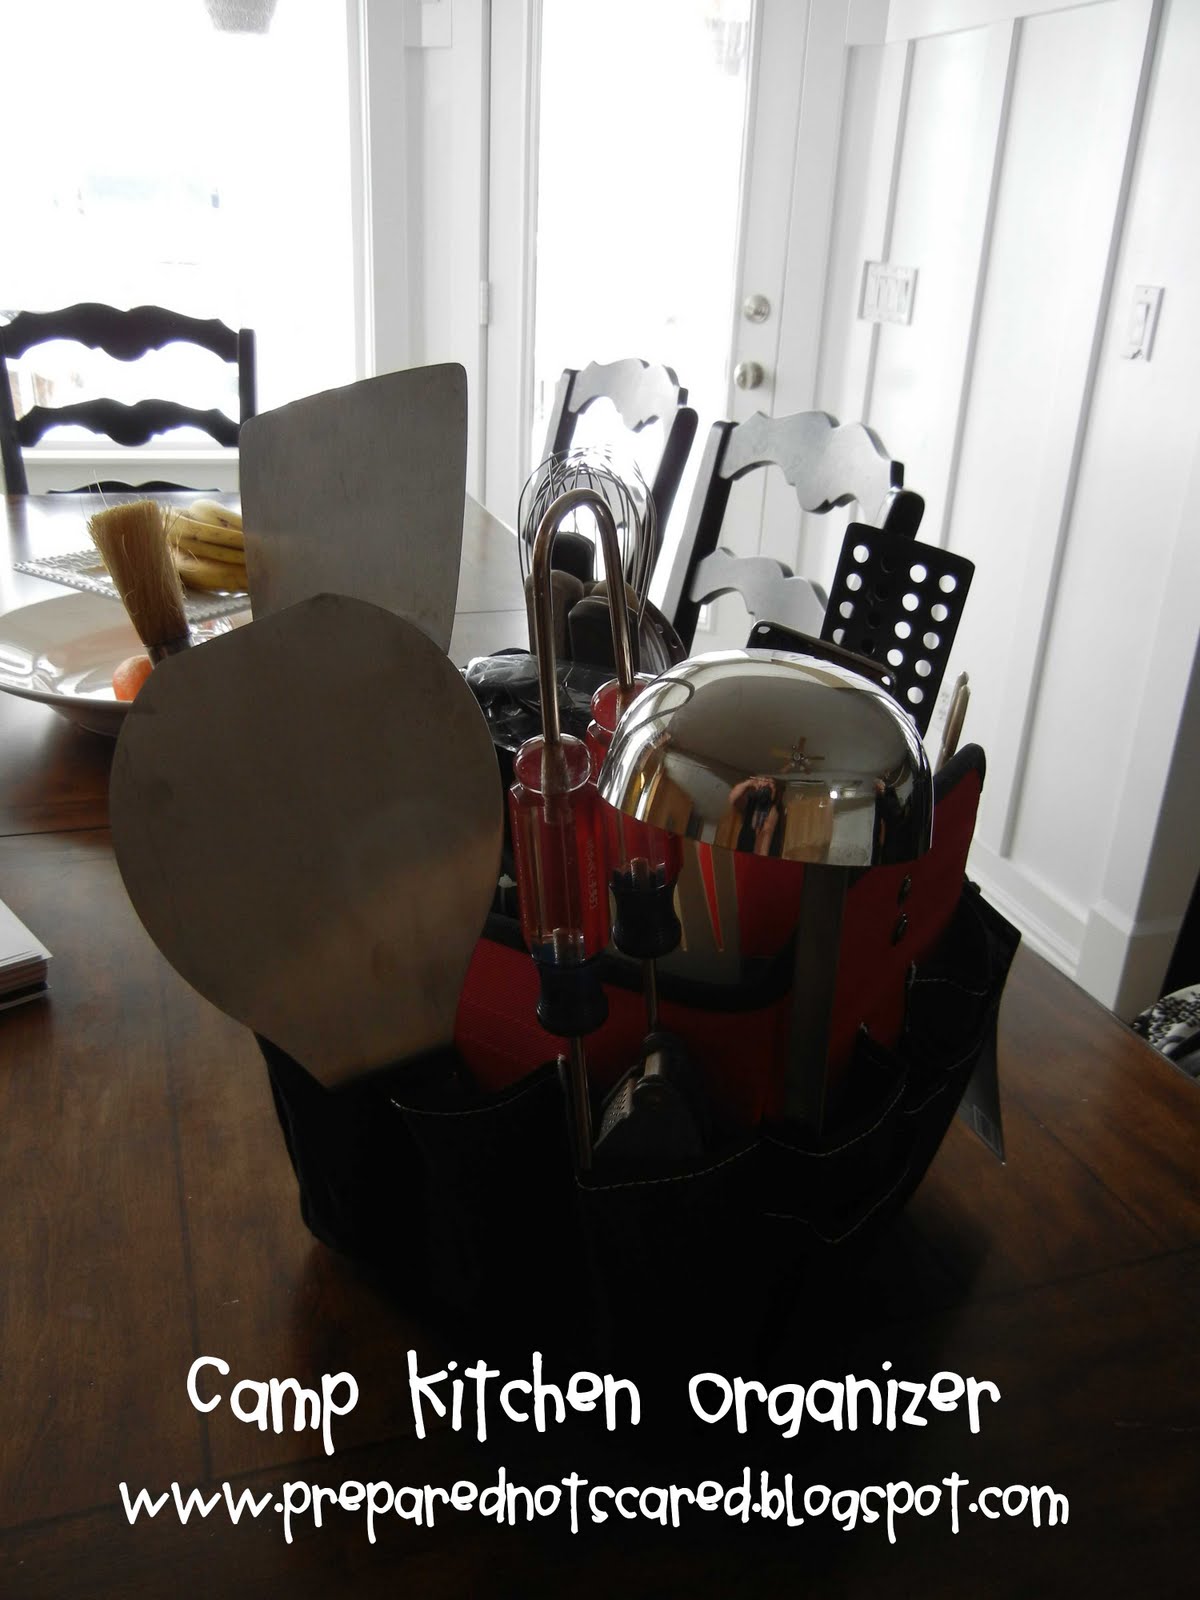
This thing is AWESOME!
It's a great way to organize
EVERYTHING
you will need to cook and prepare meals . . .
OUTDOORS!
Here's What You'll Need:
A Tool Organizer
There are a couple difference types.
One will fit over and around the top of a 5-gallon bucket.
The other looks like the one in the picture above.
Either one will work great.
(She found the one in the picture at Home Depot.)
You will also need Cooking Supplies.
Check through your drawers for extras, or purchase
a few things each month.
The dividers make it nice for organizing:
Spatulas
Tongs
Spices and Seasonings
Salt and Pepper
Spoons
Basters
Knives
Ladles
Measuring Cups and Spoons
Egg Timer
Hot Pads
Kitchen Shears
Funnel
and whatever else you use in your kitchen!
It will hold everything you need
but the kitchen sink!!!

Easy and Efficient
and in an Emergency Situation
I have a feeling this would come in
pretty handy!
...Thanks Crystal...
Thanks to the Hoytsville Girls
for letting me hang out with you last night.
What a GREAT group of LADIES!

Wednesday, October 27, 2010

Preparedness Project - Dutch Oven Barrels!

Today's Project Is:
A Barrel Cooker!
This simple barrel can cut your cook time
as well as the amount of briquettes used . . . IN HALF!
All You Need To Make This Project Is:
A Used Clean 55 Gallon Barrel.
Used 55 gallon barrels can be purchased
for between $15-25.00.
Drill with a 1/2-inch drill bit.
You will need to drill holes into each of the sections of the barrel.
(Shown Below!)
The top layer of the barrel will have 12-15 holes.
The second layer will have 10-12 holes.
The third layer will have 8-10 holes.
This will be reversed when in use!
To Use the Barrel Cooker:
If your barrel comes with a lid,
this will need to be removed before using.
Next...
Simply turn the barrel over and cover your
Dutch Ovens while they are cooking.
Keep the Dutch oven items that take the
longest amount of time to cook on the bottom,
and the Dutch ovens with a shorter cooking time
closer to the top.
The barrel will help to keep the heat
around your Dutch ovens.
That's what cuts the cooking time in half.
You will only need about
1/2 of the briquettes you normally use as well.
Layer them under the Dutch ovens and on the lids
like you normally do.
Stack Dutch Ovens on top of each other
and then cover with the barrel.
Wooden handles can be added to the sides of the barrel
to make it easier to lift, but it's not necessary.
Is that COOL or What!?!
SIMPLE...EASY...
AND VERY EFFICIENT!
Dutch Ovens and supplies can be stored 
INSIDE the barrel cooker when not in use.
Dutch Oven Caterers Swear By It!

Wednesday, October 20, 2010

Preparedness Project - Wonder Box!

For Today's Preparedness Project
we're going to be making a
Wonder Box!
Just in case you need a refresher as to
what a Wonder Box is . . .
Wonder Boxes work like vacuum flasks.
In these days when we are being warned of
worldwide shortages of food and fuel,
this wonder box and it's simplicity is designed
to keep fod at the temperature needed for cooking.
Using very little fuel you only use about 15 minutes of energy
to bring the food to the required temperature
and then put it into the
Wonder Box.  It acts like a thermos.
On the flip side, it will also keep ice cream cold
for about 4 hours.
Instructions:
Boil your food on the stove for 10-15 minutes until the food
is heated right through.
Use any cooking pot, provided it does not have a long handle, but
do not use a large pot for a small amount of food.
The Wonder Box does not work well if there is a large air space.
Remember that the more food or liquid that you have in the pot,
the longer and better it will cook.
Put the lid on the pot before you remove the pot from the stove
so the lid can also get hot.  Make sure the nest in the bottom cushion
is ready to take the pot and that it is nearby so you do not lose
heat carrying the pot around.
Place pot into the nest of the Wonder Box, making sure that the
sides are snug against the pot, so that there are no air pockets.
Make sure that no one peeks inside.
If this happens, heat will escape, and the food will not
cook properly.
Do not leave the Wonder Box on a metal surface while being used.
Metal is a good conductor of heat and may draw off some heat
through the bottom.
When cooking anything like a roast or a whole chicken, the liquid
around it can boil before the meat has reached the same
temperature.  Make sure the liquid covers the meat and it has
come to a boil.  Meat must be covered with liquid!
The cooking time seems to be 3-4 hours, or all day.
It is sure to never burn.
The Wonder Box is designed for cooking meals,
BUT . . .
It can also be used for keeping food hot, cold or frozen for
3-6 hours depending on what it is.
For Example:
Frozen meat will stay frozen longer than a tub of ice cream.
The cushions filled with polystyrene can be washed
with hot water and soap and hung on the line to dry.
You Will Need:
A Sewing Machine
Needle
Thread
2 3/4 yards of Heavy Fabric
The Pattern
(This pattern will need to be ENLARGED to fit measurements.)
and
Bean Bag Beans
(You can find these at Walmart in the pillow section.)
They are probably the most expensive part of this project,
but if you go now . . . they have been marked down quite a bit.
Here's the PDF:
Wonder Box recipes and instructions originated from a
booklet published by "Compassion" of South Africa
in 1978, 1979, and 1980.
"Compassion" registered the name Wonder Box.
This information may be freely quoted, acknowledgments
being made to "Compassion".
(Pictures By: Kathryn Pratt)
I have
3 NEW Halloween Ideas
to share with you . . .
BUT blogger is not allowing pictures to be downloaded after 5:00 pm today.
I will post as soon as I can add the photos!
Aaaaahhhhhhhh . . . I hope they hurry!

Wednesday, October 13, 2010

Preparedness Project - Back to the Basics!

Have you ever heard of the phrase,
"Use it up . . . Wear it out . . . Make it do . . . Or do without?"
I've heard it a time or two I have to say, but it hasn't been
until lately that I have really tried to apply it in my home.
YOU CAN REALLY SAVE MONEY
when you take on that motto!
We live in a time when a lot of things are just
considered disposeable it seems, but hopefully with a
different perspective . . . that will change.
When was the last time you fixed a button, or hemmed a pair of pants?
And how many of you have ever DARNED a sock?
No . . . that's not what you say when you lose one in the washer!
Instead of throwing the holey sock away . . . YOU FIX IT!
Who'da thought?!?
I only ever remember DARNING a sock
in Sewing 4 H as a part of one of the requirements!
(Oh yah . . . I was Mrs. Wooley one year with my reversable wool vest and matching pleated skirt!)
Ahhhhhh . . . the glory days!
For Today's Preparedness Project
We Will Be Working On Putting Together
A Basic Sewing Kit!
Make Sure YOU Have:
Needles
Thread
Safety Pins
Straight Pins
Sisscors
(That will actually cut fabric!)
Snaps
Hook and Eye
Velcro
Seam Ripper
Patches
Thimble
And IF You Have A Sewing Machine Make Sure YOU Have:
Bobbins
and
Extra Sewing Machine Needles
You can buy Pre-made Sewing Kits
OR
You can take the opportunity to ORGANIZE the
supplies you already have on hand!
I'll show you some easy ways to organize your sewing supplies
NEXT WEEK!
Another Halloween Idea coming later TODAY!
The BOO PDF's have been added
to yesterday's post!

Wednesday, September 29, 2010

Preparedness Project - SpOoKy FuN Halloween Decorations!

Aaahhhhhh . . .
my camera still isn't back from the shop!
I have my old camera, but the battery is dead . . . of course!
(What kind of preparedness girl has a dead battery?!?)
In my defense . . . I was planning on using my
REPAIRED camera to take the photos.
Lesson Learned:
ALWAYS
HAVE A BACK-UP PLAN!
So, it looks like you'll be getting 3 ideas tomorrow
instead of just one!
They are sooooo
FUN, FAST, 
and
EASY!
I can't wait to show you!
Idea #1:
SpOoKy SPiDeR Table Settings
Idea #2:
Halloween Scavenger Hunt
(Way FUN!)
Idea #3:
A Fabulous Family Activity
I'm soooo excited for tomorrow . . . I'm sure I won't be
able sleep, my brain just kicked into
Halloween Over-Drive!
Now that's ScArY!!!!!

Wednesday, September 22, 2010

Preparedness Project - Holiday Prep!

This project isn't really an
Emergency Preparedness Project,
but it will help to get you
PREPARED for the HOLIDAYS!
HALLOWEEN
to be exact!
Have you ever heard of the game . . . Don't Eat Frank?
All you need to play the game is a
package of small halloween candies like M&M's or Candy Corn,
and the Game Cards.
I'll supply the game pieces . . . YOU supply the candy!
This is a great game for classroom parties.
Divide the class into groups or if stick together as one group if
you are playing as a family.
Put a piece of candy on each of the squares on the card.
Have one peson leave the room.
The rest of the group will choose one of the
Halloween caracters to be "FRANK".
The person can come back into to the room.
He or she can eat the candy from the card until they get to the
square that was chosen to be "FRANK".
As soon as they go to pick up that piece of candy
every will yell, "DON'T EAT FRANK!" and their turn is over.
Let everyone in the group take a turn.
Each time they leave the room the rest of the group
will choose a NEW FRANK!
It's a Super Fun and Super Easy
way to keep EVERYONE entertained!
Here's the PDF:
Game cards need to be CUT and LAMINATED!
More Halloween Fun to Come!!!

Wednesday, September 15, 2010

Preparedness Project - Soup Mix Recipe Book!

The Soup Mix Recipe Book is
FINALLY HERE!!!
Yay . . . Whoopie . . . Fhew!
There is one small catch . . .
Two of my boys have had assignments that required the
internet all day so I won't be able to load the
PDF and pictures until tomorrow.
I kept trying to sneak and load a few things
during their breaks . . . but it didn't work.
That means 3 posts tomorrow.
1st Post:
The Soup Mix Recipe Book
2nd Post:
A Conference Memory Game
3rd Post:
A Fun Family Activity
SHOULD BE A GOOD DAY!

Wednesday, September 8, 2010

Preparedness Project - Family Home Evening Board!

Today's Project is a Family Home Evening Board!
(The pictures aren't the best . . . but at least they'll give you an idea
of what the project looks like.)

This family home evening board can be adapted to fit any size family.
Prices are as follows:
Family of 5 - 1x10x31"
$15.00 plus shipping
Family of 6 - 1x10x37"
$17.00 plus shipping
Family of 7 - 1x10x43"
$19.00 plus shipping
Family of 7 to 8 - 1x18x25"
$17.00 plus shipping
Family of 9 to 10 - 1x18x31"
$19.00 plus shipping
If your family is still in the "works" you may want to add a
couple extra spaces.  These spaces can be filled with family photo's
until you fill them with your new additions!
The FHE Kit Includes:
A Wooden Base
Tin
and
Vinyl Letters - includes ALL 10 FHE Options!
(The kit will include instructions for assembly.)
Rod Iron Hangers can be found at Tiawan Imports
for between $7-$10.00.
You just have to purchase some E600 Glue, Ribbon, and a
Magnetic Frame for each of the members of your family.
I found my frames at Walmart, but they have them at
Target, Shopko and Craft and Hobby Stores.
Ribbon can also be added to the picture frames as well.
If I had girls, I would add the cute handmade flowers to the
corners of their frames.  I added one to mine just for FuN!
Add pictures of each of the members of your family to the
magnetic frames and you're ready for
Family Home Evening!
Here are some options you can use for
FHE Assignments:
Opening Prayer
Scripture
Thought
Lesson
Song
Scripture
Activity
Treat
Journal Pages or FHE Minutes
and
Closing Prayer
You decide what assignments you want to use on your board.
For Orders and Pricing Call:
(801)309-7183
or
(801)939-4099
This is a
SUPER EASY PROJECT
to put together . . .
and it's
SOOOO CUTE
when it's all finished!

Thursday, August 26, 2010

5 More Food Storage Christmas Gift Ideas!

Posting these Christmas ideas is making me want to pull out
the Christmas music, BUT my husband makes me wait until at least September!
Just a few more days . . . Woot Woot!
(Casey, hope you're ready for Dolly's "I'll Be Home With Bells On!")
Soooo Exciting!!!
HERE'S THE 6TH IDEA
You Will Need:
Hot Chocolate Mix
Mini Marshmallows
Milk Chocolate Chips
White Chocolate Chips
Peppermint Candy Cane Pieces
1 Quart or Pint-Sized Jar
Some Ribbon
and
A Copy of the Tag

HERE'S THE 7TH IDEA
You Will Need:
1 Roll of Toilet Paper
(A definate food storage and emergency preparedness need!)
1 Clear Cellophane Bag
Some Ribbon
and
A Copy of the Tag 

HERE'S THE 8TH IDEA
You Will Need:
1 Can of Campbell's Soup
Christmas Scrapbook Paper
A Glue Stick
Some Ribbon
and
A Copy of the Tag 

HERE'S THE 9TH IDEA
You Will Need:
Some Candles, A Flashlight, or An Inexpensive Lantern
1 Clear Cellophane Bag
Some Ribbon
and
A Copy of the Tag
HERE'S THE 10TH IDEA
You Will Need:
1 Can of Wheat
(Cost between $2.60-$2.70 at the Dry Pack!)
Some Ribbon
and
A Copy of the Tag
Here's the PDF:
Christmas Gifts File 2
Here's the "S-Wheat" Christmas Tags PDF:
"S-Wheat" Christmas Tags PDF
(Pictures ARE Coming . . . I Promise!)
Watch for Another Idea Tomorrow!

Wednesday, August 25, 2010

Preparedness Projects - It's Christmas in August!

Are you ready for Christmas . . . in AUGUST?!?
Here are a few
EASY and INEXPENSIVE
Food Storage Neighborhood Gifts
for you to make ahead of time.

Can you imagine a stress-free December?
HERE'S THE 1ST IDEA
You Will Need:
1 Quart-Sized Canning Jar
Pasta
(Christmas Pasta is fun, but any pasta will do!)
2/3 cup Magic Mix
Here's the Recipe:
2 1/3 cups Dry Powdered Milk
1 cup All-Purpose Flour
1 cup (2 sticks) Butter, at room temperature
Instructions:
Combine dry milk, flour or cornstarch,
and butter into a large bowl.
Mix with electric hand mixer until it looks like cornmeal.
Keep mix tightly covered in the refrigerator
for up to 8 months.
Yield: 5 Cups!
To Make Alfredo Sauce:
2/3 cup Magic Mix
1 cup Water
In saucepan, combine Magic Mix and water.
Stir rapidly with a wire whisk over medium heat until
mixture starts to bubble and thicken.
Season with a little garlic salt and you have the perfect dinner
for after a long day of Christmas Shopping!
Yield: 1 Cup Sauce
Some Ribbon
and
A Copy of the Tag
(Front)

(Back)

HERE'S THE 2ND IDEA
You Will Need:
A Small Potted Plant
1 Package of Garden or Herb Seeds
1 Wooden Skewer
Some Ribbon
and
A Copy of the Tag

HERE'S THE 3RD IDEA
You Will Need:
Charcoal Briquettes
A Clear Cellophane Bag
Some Ribbon
and
A Copy of the Tag
HERE'S THE 4TH IDEA
You Will Need:
1 Small Sewing Kit
(You can find some cute inexpensive ones at Target!)
Some Ribbon
and
A Copy of the Tag
HERE'S THE 5TH IDEA
You Will Need:
A Clear Cellophane Bag
Graham Crackers
Hershey's Chocolate Bars
Marshmallows
1 Quart-Sized Paint Can
A Paint Can Opener
1 Small Box of Matches
1 Roll of Toilet Paper
1 Bottle of Alcohol
Some Ribbon
and
A Copy of the Tag
Here's the Link to the Stove Instructions:
Just follow the last part of the tutorial with the
quart-sized can, the toilet paper, and the alcohol!
Check Back Tomorrow for 5 More Ideas!
Here's is the PDF:

Wednesday, August 4, 2010

Preparedness Project - Kids Keepsake Boxes!

This one's an EASY one . . . but will keep you
from getting burried in the soon to be coming,
ever abundant school papers!
It's called a
Kids Keepsake Box!
This is what Curtis' box looked like at the end of last year.
We were able to weed it down to less than half of what you see.
All you need to make this SANITY SAVING Box is:
1 Sweater Tote and a Label.
This box will be used throughout the school year.
Art Projects, Assignments, and Pictures can be
collected in the box throughout the year.
The Keepsake Boxes can be stored under the bed,
on a shelf in the closet, in a locker at home, or in a cupboard.
Here are a few of the rules I set for myself when I was
trying to decide what to keep and what to let go.
#1:
If the paper is just a fill-in-the-blank assignment,
or an assignment that will produce the same results for
every child in the class,
LET IT GO!
#2:
If the artwork is too large to fit into an 8 1/2" x 11" sheet protector,
take a picture of your child holding the giant piece of artwork,
and then . . . LET IT GO!
Adding their cute smiles to their artwork will
make it priceless!
#3:
If you have more papers than will fit into the sweater box,
LET SOME OF THEM GO!
When my boys were little, they wanted to keep EVERY paper,
EVERY assignment, and EVERY piece of artwork
they ever did.  I let them keep as many as they wanted
until the end of the year (or until the box was full)
and then I had them choose their favorites.
 
It only takes a little while for too many school papers
to go from being a treasure to a pile of paper clutter.
Give them a place and then set limits!
#4:
If it tells a story about who they are, or shows their personality
on paper . . . it's a keeper for sure!
They say, "A picture is worth a thousand words" . . . UNLESS
it's an original story written by your child.
I love to read the stories my children have written.
They make me laugh, cry, and most of all REMEMBER.
These are the pages you'll actually read again and again.
Pages like these help you to remember what they were interested
in at the time, and the best part of all, it lets you see their personality!
So if it tells a story . . .
KEEP IT!
#5:
Artwork makes great stationary for letters to
Grandparents, Missionaries, and Friends.
Have your kids write letters on the back and
SEND THEM ON THEIR WAY!
Grandma and Grandpa will love these masterpieces!
The rest of the pages can be added to your child's scrapbook
at the end of every year!
Get ready . . . It's almost time!
The paper will be here before you know it!!!

Tuesday, August 3, 2010

Ark Prep 101 - Follow Up for the Emergency School Bags!

Emergency School Bags
Follow Up!
I had some people who were interested in starting this
program in their schools and wondered where to start.
In order to start a program like this,
you have to start at the top.
The Principal is the first stop.
Explain the program and how it works.
The next stop would be with the PTA President.
Followed by the Teachers and Parents.
This topic would fall under the
Health and Safety department of the PTA
and would be a great activity to do during
Safety Week.
I have included a letter that could be sent to the
teachers as well as the parents.
The letters include a description of what the
Emergency School Bags are along with a contents list.
Here's the PDF for the Letters:
The Contents Lists are broken up into two lists.
The First List will be purchased in bulk to help save money
and to keep the contents of the bag equal in size and content.
Parents would be responsible for purchasing these items.
The Second List will be provided by the parents of the students.
I am checking the prices of the items in the first list.
I will post the best bulk prices I can find
along with the links to their websites.
I would like to see if I can keep the cost to under $5.00 per bag.
A $.50 fee would be included in the cost so that a class tote
can be purchased.  This will stay in the child's classroom and be
used to store all of the Emergency School Bags.
Hope that helps!
It might take a little bit of time to put together . . . but it will
be time well spent!
I would love to hear what you are doing in your schools
to help with safety and preparedness.

Wednesday, July 28, 2010

Preparedness Project - Emergency School Bags!

I think
Wednesday is my favorite post day
of the week.
I love being able to do something that I can check
off my list and it actually stays done for a while.
With the dishes and the laundry, the check mark on my
To Do List only stays checked for a minute
and then it's time to do it all over again.
Can I get a Whoot Whoot for laundry?!?
Love It!
I have two projects for you today.
(Should be a productive day!)
The first project is the
Emergency School Bags.

The second project is an organizing project
that will help you to
get the kids ready for school . . .
STRESS-FREE!
Here we go . . .
Emergency School Bags can be stored in a tote
in your child's classroom.
The contents fit into a gallon-sized Ziploc bag and
are filled by the parents.
The Contents Include:
N95 Mask
Water
Food Bar
Small Bag of Candy
Small Flashlight
Rain Poncho
Small Emergency Blanket
Glow Bracelet
Family Picture

A Small Wrapped Gift
(To keep their hands busy and their minds in a happy place.)

A Letter from Mom and Dad
(If you are not able to get to them for a while, a letter from you
 could really help to them feel more secure in a scary situation.)
and a
Quick Glance I.D. Tag
Front:

Back:
Here's the PDF:
(Use page 3 of the PDF as your Quick Glance I.D. Tag)
The Emergency School Bags will be sent home
with the child on the last day of school.
The only thing you would need to trade out for
the next year is the Food Bar, Water, and Candy.
The Letter, Family Photo, and I.D. Tag can also be up-dated.
I give my kids the gift as a little graduation to the next
class surprise, so that will also have to be replaced
for the next year.
This is definately a project that needs to
organized by the parents.
Teacher's have a lot on their plates and anything
we can do to lighten their load will be much appreciated I'm sure!
I love simple things that can make such a difference
in an Emergency Situation.